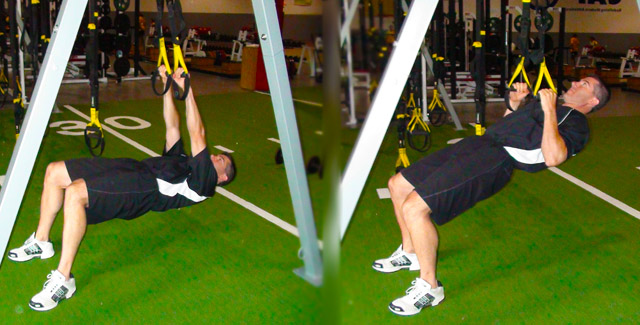
The TRX is a very versatile piece of equipment and is being used more and more by strength & conditioning coaches in their athletes’ training programs. There are literally hundreds of movements that can be performed with the TRX. Today, we are going to discuss the TRX Row.
Strengthening the Decelerators of the Shoulder
For the baseball player, the TRX row will challenge the athlete’s back and arm strength, core stability, and grip strength. While the grip and core work is a bonus, the muscles we are looking to strengthen are the latissimus dorsi and the teres major, two major players when it comes to decelerating the arm in the follow-through phase. Furthermore, the scapular retraction taking place during the movement will help stabilize the shoulders.
More baseball players experience shoulder injuries in the follow-through phase of throwing because of major imbalances between the accelerators and decelerators of the shoulder. Baseball players repeatedly train the front of the shoulder with daily throwing while the rear shoulder experiences less development. Hence, an imbalance is created and the chance of injury increases. So, performing posterior chain exercises for the back can help strengthen the rear shoulder and those muscles which help decelerate the arm.
Basic TRX Row
This movement is a great place to start for those younger or weaker athletes who cannot perform pullups. Also, if you have never performed this movement before, it’s best to start with a more basic setup.
- Shorten the TRX straps all the way up.
- Face the anchor point and set your body in a straight line (similar to a plank). Your ears, shoulders, hips, knees, and ankles should be in a line.
- Keeping your arms straight with palms facing each other, walk your feet forward until there is tension in the straps.
- To begin the movement, retract your shoulder blades back and down. Then, pull your torso towards your hands keeping your elbows close to your body. Your body should remain rigid and your palms and wrists should stay neutral.
- Lower your body back to the starting position and repeat.
If the movement is too easy, move your feet farther forward. If it is too difficult to complete with correct form, move your feet back.
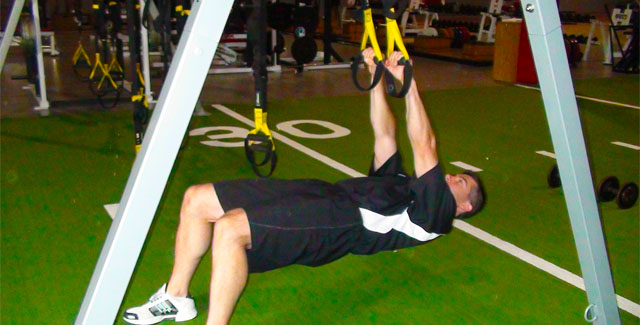
TRX Low Row
When you have mastered the basic TRX row, it’s time to challenge yourself even more with the TRX Low Row. It’s the same setup and movement as the basic row, but with you torso directly under the anchor point. This increases the difficulty by forcing the athlete to lift more of his bodyweight when performing the movement. The photo shows the athlete with his knees bent, which is perfectly okay. However, if you want to advance the movement even more, you can keep your legs straight, or even elevate your feet onto a box.
No matter how you decide to challenge yourself with the TRX Row, make sure you are performing the movement with great form. Examples of poor form include:
- Sinking your hips or raising your hips. Keep your core tight.
- Crunching the torso at the top of the movement. Keep your body in a straight line.
- Curling the wrists. Keep the wrists neutral.
For more information on the TRX, visit the TRX website.

Leave a Reply